VLANS on GNS3
What is Access Port in Switch?
We need to configure the Switch interfaces for end-user devices. In this process, we need to set specific ports as Access Ports.
This port is used only for connecting end-user devices such as computers and printers.
If you want to configure the interfaces of the Switches for end-user devices, you need to specify those ports as Access Ports. This port is usually used only to connect end-user devices such as computers and printers.
When configuring VLANs on Cisco Switches, you need to add a user on the network to the created VLAN. When doing this, you need to plug the Ethernet interface of the user computer into the relevant port of the Switch and also configure this port as Access Mode.
In short, all computers that will be connected to the Switch are configured as access mode!
If you add another Switch to the network environment, you need to configure the ports connected from the Switch to the Switch as TRUNK connections.
The switchport mode access command is used in the config mode of the relevant interface to configure a port as Access on the Cisco Switch.
How to Configure the Cisco Switch’s Interface as Access Mode
To connect the end devices to the ports of the Cisco switch, first open the CLI command prompt. Then, apply the relevant commands on the ports you selected as Access.
1
2
3
4
5
6
L2-1# conf t
L2-1(config)# interface Gi 0/0
L2-1(config-if)# switchport mode access
L2-1(config-if)# switchport access vlan 10
L2-1(config-if)# end
L2-1# wr me
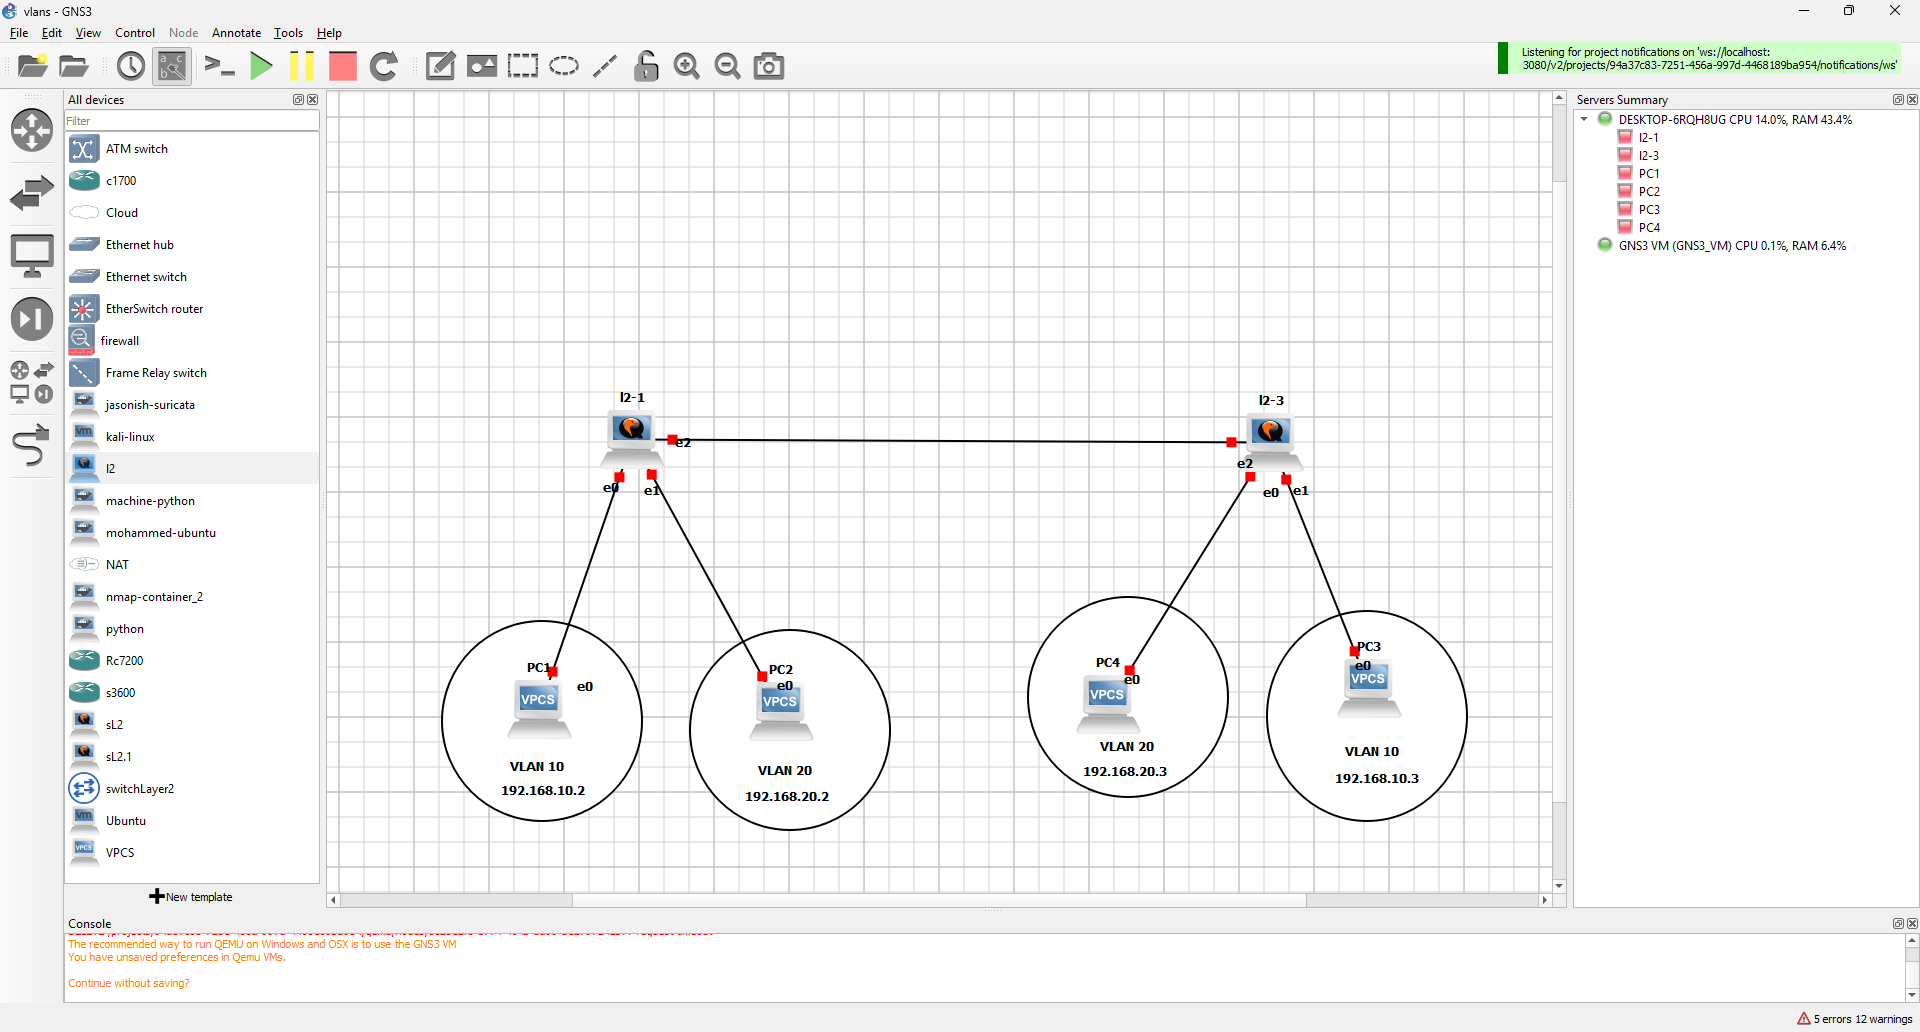
Switchport Mode Access = We have configured the Cisco Switch interface to which PC1 in the network topology is connected as Access mode.
Switchport Access Vlan 10 = We have made PC1 in the network topology a member of the created VLAN10.
1
2
3
4
5
6
L2-1# conf t
L2-1(config)# interface Gi 0/1
L2-1(config-if)# switchport mode access
L2-1(config-if)# switchport access vlan 20
L2-1(config-if)# end
L2-1# wr me
On the second Switch :
1
2
3
4
5
6
L2-3# conf t
L2-3(config)# interface Gi 0/0
L2-3(config-if)# switchport mode access
L2-3(config-if)# switchport access vlan 20
L2-3(config-if)# end
L2-3# wr me
It depand always on the ports you choose
1
2
3
4
5
6
L2-3# conf t
L2-3(config)# interface Gi 0/1
L2-3(config-if)# switchport mode access
L2-3(config-if)# switchport access vlan 10
L2-3(config-if)# end
L2-3# wr me
GENERAL FORM
1
2
3
4
Switch(config)# interface <type-port>
Switch(config-if)# switchport mode access
Switch(config-if)# switchport access vlan <vlan-id>
Switch(config-if)# end
After giving each Vpc Ip add using this commande for exemple
1
2
3
ip 192.168.10.2
//or
ip 192.168.10.2/24 255.255.255.0
try to ping to vps in the same Vlan but in a diffrent Switch !!!!
If you add another Switch to the network environment, you need to configure the ports connected from the Switch to the Switch as TRUNK connections.
What is a Trunk Port?
we examined the configuration of the Access Port in Switches. Access Ports belong to a single VLAN and do not make any frame changes for the VLAN information carried between the Switches, only the incoming traffic.
All VLANs configured with the Trunk Port defined on the two Switches are forwarded. VLAN information is encapsulated before passing through the Port, which is encapsulation ISL or 802.1Q.
In two Switches connected, the Trunk connection must be configured on two interfaces in order to pass different VLANs.
What is a Cisco Trunk?
In Cisco networking, a trunk is a link between two switches (or between a switch and a router) that carries multiple VLANs. This allows different VLANs to communicate across multiple network devices while maintaining segmentation.
Key Features of a Cisco Trunk:
- Carries Multiple VLANs – Unlike access ports that only allow traffic from a single VLAN, trunk ports can carry traffic for multiple VLANs.
- Uses VLAN Tagging – VLAN information is added to Ethernet frames using either:
- IEEE 802.1Q (Dot1Q) – The standard VLAN tagging method.
- Cisco ISL (Inter-Switch Link) – A Cisco proprietary tagging protocol (rarely used today).
- Enables Inter-VLAN Communication – When used with a Layer 3 device, trunking allows communication between different VLANs.
- Commonly Used Between Switches – Typically used to connect two switches or a switch and a router (Router-on-a-Stick).
Trunk Configuration on a Cisco Switch
To configure a trunk on a Cisco switch, use the following commands:
1
2
3
4
5
L2-1(config)# interface GigabitEthernet0/2
L2-1(config-if)# switchport mode trunk
L2-1(config-if)# switchport trunk allowed vlan 10,20
L2-1(config-if)# switchport trunk native vlan 99
L2-1(config-if)# exit
On the second Switch
1
2
3
4
5
L2-3(config)# interface GigabitEthernet0/2
L2-3(config-if)# switchport mode trunk
L2-3(config-if)# switchport trunk allowed vlan 10,20
L2-3(config-if)# switchport trunk native vlan 99
L2-3(config-if)# exit
Explanation of Commands:
switchport mode trunk→ Sets the port as a trunk.switchport trunk allowed vlan 10,20→ Allows only VLANs 10, and 20 on the trunk.switchport trunk native vlan 99→ Sets VLAN 99 as the native VLAN (untagged traffic will belong to this VLAN).
Native VLAN in Trunking
- The native VLAN is the VLAN that is sent without tagging.
- Mismatched native VLANs between switches can cause VLAN hopping attacks.
Verifying Trunk Configuration
Use the following command to check the trunk status:
1
Switch# show interfaces trunk
Use Cases of Trunking
- Connecting two switches to allow VLANs to span across multiple devices.
- Connecting a switch to a router for Router-on-a-Stick inter-VLAN routing.